Gypsum Drywall Construction: Benefits and Options
When it comes to building or remodeling interior spaces, few materials offer the versatility and ease of gypsum drywall construction. It’s widely used in both residential and commercial settings for good reason. It’s fast, cost-effective, fire-resistant, and delivers a clean, modern finish. Whether you’re outfitting an office, finishing a basement, or constructing interior partitions, gypsum drywall construction offers a streamlined solution with multiple finishing and design options.
Let’s look into everything you need to know. From what is gypsum drywall, to framing, finishing, and choosing between ceiling types. This guide will help homeowners and contractors make smart, informed decisions during the building process.
What is Gypsum Drywall?
You’ve probably heard the term before, but what is gypsum drywall, really? In the simplest terms, it’s a panel made of calcium sulfate dihydrate (gypsum), sandwiched between two sheets of heavy paper. This composite board is cut to size and screwed into place to form walls and ceilings.
Its advantages include:
- Fire resistance (thanks to the water content in gypsum)
- Sound dampening qualities
- Smooth finish for painting or wallpapering
- Affordability compared to other wall systems
At Mada Gypsum we offer various gypsum-based boards tailored to different needs like moisture-resistant, fire-rated, and impact-resistant types, to name a few. These specialized boards can add durability or meet specific code requirements.
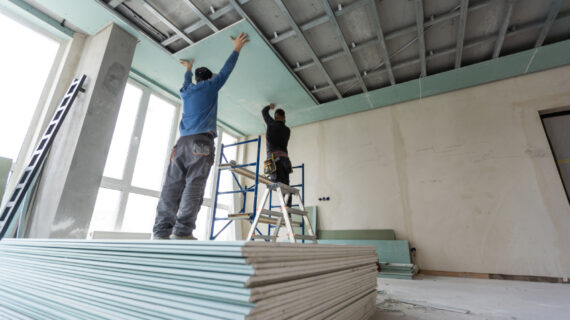
Things to Consider When Installing Drywall
Selecting the appropriate board is only one aspect of planning a drywall installation. Here are key factors to consider before and during the process:
- Moisture Exposure
Areas like bathrooms or basements need moisture-resistant drywall (also known as green board). Regular drywall can absorb water, leading to mold or degradation.
- Room Function
High-traffic areas may benefit from impact-resistant drywall. Likewise, if sound control is important (e.g., between apartments or offices), look into soundproof drywall options.
- Framing
Your framing needs to be precise. Crooked studs or uneven framing will make installation harder and reduce the quality of the final result. We’ll explore how to frame drywall effectively in the next section.
- Electrical and Plumbing
Ensure all behind-the-wall components (like wiring and pipes) are completed before installing drywall. Once the panels are up, access becomes far more difficult.
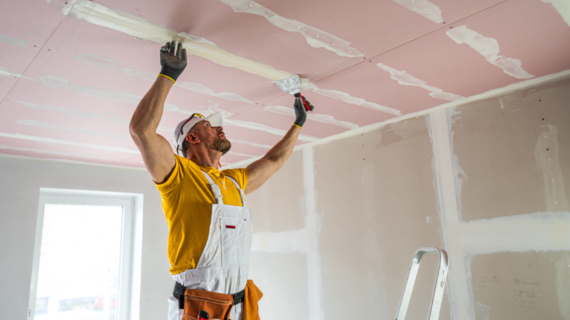
- Joint Treatment
All panel joints will need to be taped and treated with joint compound. Understanding the drywall levels of finishing is essential to achieving a professional appearance.
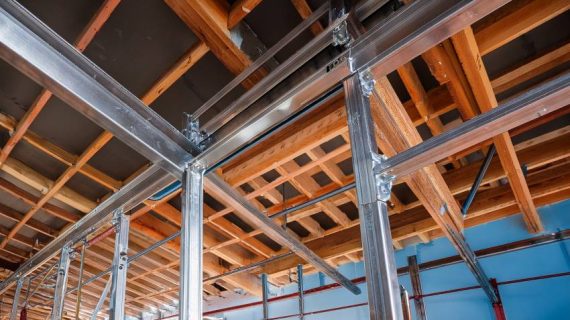
Everything You Need to Know About Drywall Framing
The foundation of a neat and strong wall system is proper framing. Either metal studs, which are preferred in commercial settings because of their resilience to fire and warping, or wood studs, which are frequently used in residential construction, are typically used by builders to frame drywall.
Here’s how to get it right:
- Space studs 16 inches apart on center
The industry standard for most gypsum drywall construction is to space your studs 16 inches “on center”. That means from the center of one stud to the center of the next. This spacing provides optimal support for 4-foot wide drywall panels, helping to prevent sagging, bowing, or flexing over time. In some cases, like for ceiling applications or areas prone to heavy impact, you might tighten the spacing to 12 inches for added strength.
- Check for plumb and level
Even small misalignments in your framing can cause big headaches when it comes time to hang drywall. Use a laser level, plumb bob, or spirit level to ensure your studs are perfectly vertical (plumb) and that top and bottom plates are level across the span of the wall. Crooked framing leads to uneven seams, visible bulges, and gaps that are tough to hide—even with the best finishing skills.
- Leave space for insulation
If your wall needs to meet certain acoustic or energy performance standards, be sure to leave adequate space for insulation between the studs. For soundproofing, consider adding acoustic batts or mineral wool, which not only improves privacy between rooms but also contributes to a more comfortable indoor environment. For thermal efficiency—especially in exterior walls or basements—use fiberglass or foam insulation rated for your climate.
- Use the right fasteners for the job
If you’re working in an area with high humidity, such as bathrooms, basements, or coastal environments, it’s important to use corrosion-resistant fasteners, especially when framing with metal studs. Standard screws may rust over time, compromising both structural integrity and appearance. Galvanized or stainless-steel screws are your best bet for long-term durability in damp settings.
Every stage of drywall installation builds on the last, and if the framing isn’t solid, nothing else will be either. Misaligned studs can cause drywall sheets to pop or crack under stress. Gaps or poor fastener placement can create weak points, especially around doors and windows. And inadequate spacing can result in boards that flex between supports—leading to visible imperfections even after a top-tier finish.
So before you even think about hanging drywall, take the time to frame it properly. Measure twice. Level everything. Use quality materials. Doing so lays the groundwork for a long-lasting, smooth wall that looks great and performs well over time.
Drywall Finishing Levels: 5 Stages for Perfect Walls
Finishing affects the grip and appearance of paint, wallpaper, or tiles and goes beyond just smoothing things out. There are five drywall levels of finish, ranging from basic to premium.
Level 0: No Finish
Used in temporary construction or storage. Just the board is in place, no taping or mudding.
Level 1: Basic Taping
Tape is embedded in the joint compound, but nothing more. Often used in garages or attics where aesthetics don’t matter.
Level 2: Lite Finish
Additional coat over joints. Suitable for areas to be covered with tile or heavy texture.
Level 3: Medium Finish
A full coat on joints and fasteners. Ideal if a textured wall will be applied.
Level 4: Standard Finish
Smooth and ready for flat paint or light textures. This is the go-to for most homes and offices.
Level 5: High-End Finish
Adds a skim coat over the entire wall for the smoothest surface. Best for high-end spaces with gloss or semi-gloss paints.
Choosing the right level ensures your space meets its visual and performance goals.
Control Joints vs Expansion Joints in Drywall Explained
As buildings settle and expand due to temperature or humidity changes, drywall needs built-in flexibility to avoid cracking. That’s where drywall joints like control and expansion joints come into play.
Control Joints:
- Designed to manage expected shrinkage or expansion in long runs of drywall.
- Typically placed every 30 feet on ceilings or long walls.
- Reduces the risk of stress cracks.
Expansion Joints:
- Used between different structural elements of a building.
- Allow independent movement, especially in multi-wing or segmented buildings.
- Vital in commercial construction to prevent buckling or warping.
Knowing when and where to install each type can save time and money on drywall fixes down the line.
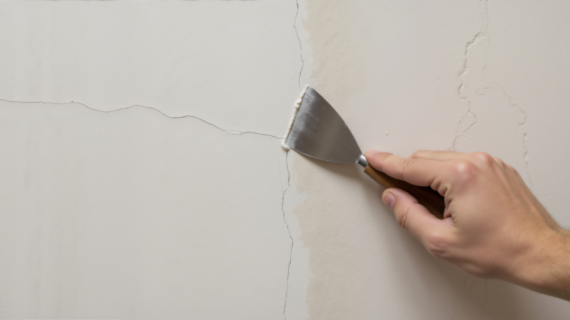
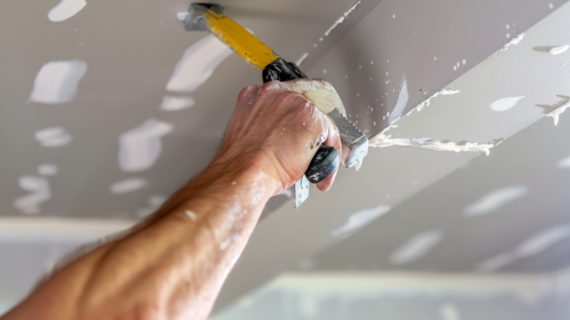
Drywall Repair: Fix Cracks, Holes and Damage with Ease
Even in the best-built spaces, drywall isn’t immune to damage. From everyday wear and tear to accidental impacts or settling foundations, small flaws can appear over time. Fortunately, most drywall issues are simple to fix with the right materials and techniques. Here’s how to tackle the most common problems.
Hairline Cracks
Hairline cracks often appear near corners, windows, or doors, and are typically the result of minor structural settling or changes in humidity. These thin fractures might look harmless, but they can grow if not properly treated.
Repair tip: Start by widening the crack slightly with a utility knife to create space for the joint compound to bond. Apply drywall tape (mesh or paper) over the crack, followed by two to three thin layers of joint compound. Let each coat dry completely, sanding lightly in between to ensure a smooth surface. Finish by priming and painting.
Small Holes (Under 1 Inch)
Small holes, often caused by nails, screws, or door handles, are quick to repair and require minimal tools. Despite their size, they can still be an eyesore if left unattended.
Repair tip: Clean out any loose debris from the hole and fill it with lightweight spackle or all-purpose joint compound using a putty knife. Once it’s fully dry, sand the surface until it’s flush with the surrounding wall. Prime the area before repainting to avoid uneven coverage or flashing.
Medium Holes (1–6 Inches)
These holes might result from minor accidents, such as a doorknob swing or a misplaced elbow. They’re too large for spackle alone, but small enough to fix without cutting into studs.
Repair tip: Use a drywall patch kit, which typically includes a self-adhesive mesh or metal patch. First, place the patch over the hole, making sure it extends at least an inch beyond the damage on all sides. Apply joint compound over the patch, feathering it outward in thin, even layers. Let it dry, sand smooth, and repeat as needed to fully blend it in.
Large Damage (Over 6 Inches or Irregular Shapes)
If the drywall is punctured, cracked extensively, or compromised by moisture, it’s best to remove and replace the affected section. This type of repair requires cutting a new piece of drywall to size.
Repair tip: Use a utility knife or drywall saw to create clean, square edges around the damaged area. Cut a matching piece of drywall to fit, and attach it to backing strips or framing within the wall. Secure the patch with drywall screws, tape the seams, and apply joint compound in multiple coats. Once smooth, sand, prime, and paint.
After any drywall fix, priming is non-negotiable. Joint compound is more porous than the surrounding painted surface, so applying paint directly can lead to dull patches or inconsistent texture. Always apply a high-quality drywall primer before your topcoat to ensure even color, better paint adhesion, and a flawless finish.
Drywall Ceiling vs Drop Ceiling: Main Differences
When it comes to finishing the top of a room, the choice between drywall ceiling vs drop ceiling depends on the setting and desired aesthetics.
Drywall Ceiling:
- Clean, seamless look.
- Better sound insulation.
- More permanent, but harder to access wiring or pipes.
- Ideal for living rooms, bedrooms, or upscale office spaces.
Drop Ceiling (also called suspended ceiling):
- Composed of a grid and removable tiles.
- Easier access to utilities above.
- Great for basements or commercial buildings.
- Limited design flexibility and slightly reduces ceiling height.
Evaluate the pros and cons of each based on your space and long-term maintenance needs.
Gypsum drywall construction is one of the most reliable and versatile interior finishing methods available today. From its fire-resistant core to the vast array of finishing options, it fits virtually any building type or design style. Whether you’re repairing existing walls, framing new ones, or finishing a ceiling, drywall offers a practical, attractive solution.
Need professional advice or materials? Contact us today at Mada Gyspyum to explore various options. With careful planning and quality execution, gypsum drywall construction can deliver exceptional results that last for years.